本文共 8312 字,大约阅读时间需要 27 分钟。
Java基础介绍
1、基于Windows系统的Java运行环境的搭建
1.1、JDK环境的配置
1.1.1、下载JDK11
点击链接:,进入下载的网站后,点击下面的图示:

不过下载得登录Oracle账号,有账号的小伙伴可以直接下载,没有的就保存我给的安装包吧(百度云盘)
链接:https://pan.baidu.com/s/16EcTfIrY0USdUSHi47Npgg
提取码:i36n
1.1.2、安装JDK11
下载完之后就直接双击(.exe)文件进行下载,安装JDK的地方自己决定,但要注意一点,安装JDK的文件夹最好不要用中文命名,因为之后的环境配置需要用到文件夹路径,使用中文容易发生错误。
1.1.3、配置JDK11的运行环境
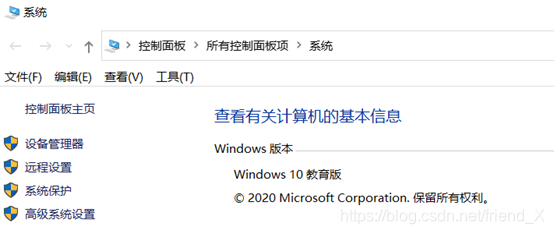
第一步:进入电脑的高级系统设置(进入此电脑界面后右键点击空白区域,出现选项框后点击属性选项便可看到高级系统设置)如图所示:
第二步:点击高级系统设置,进入以下界面,然后点击环境变量进行环境变量的配置。

第三步:配置环境变量:加入环境变量JAVA_HOME,参数为JDK11的安装路径,比如:E:\jdk11;之后在Path环境变量中加入%JAVA_HOME%\bin,点击确定便配置好环境了。如图所示:


1.1.4、确认JDK11配置成功
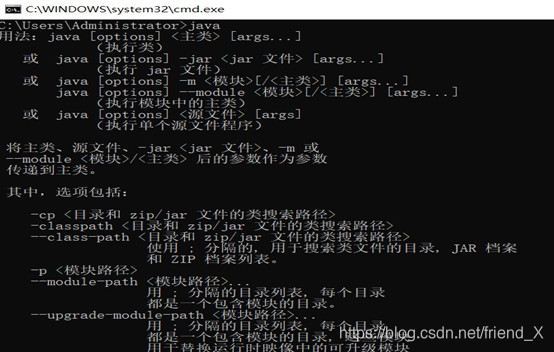
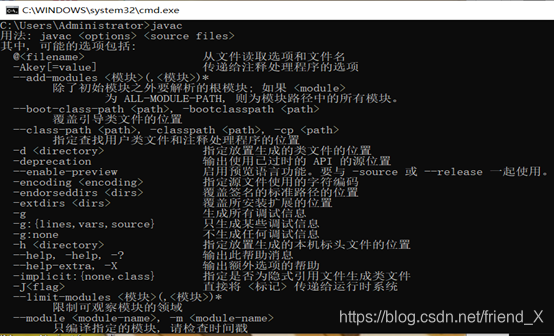
点击Windows键+R键,在输入栏中输入cmd,进入命令提示符窗口,之后依次输入java、javac、java -version三个指令,出现以下三个画面即表示配置成功。

1.2 、安装Java开发工具Eclipse或IDEA
这个我在这就不多做介绍了,网上有很多的安装教程,自己选择一个开发工具进行安装即可。
1.3、如何进行简单的Java项目编写
打开Eclipse,点击File,然后找到new选项,之后再找到 new project点击,接着选择java project,点击next,编写project name 如: project01,编写完了点击finish,便创建好了Java项目的运行工程环境。
接着在project01下的src文件夹下右键点击new创建一个Package,之后再Package下右键new创建一个Class文件,在Class文件中便可以编写Java程序。
注意:代码需要写在public static void main(String[] args) { }该段代码的大括号中,编写好代码后,右键空白区域点击Run AS选项便可运行程序。例如:
public class Demo{ public static void main(String[] args) { //该语句是Java程序中的输出语句,将括号内的内容输出到控制台显示 System.out.println("Hello Java"); }}
2、Java的基础语法介绍
想要正确使用一门语言,那了解这门语言的基础语法是不可缺少的,下面就来介绍Java这门语言的基础语法吧
2.1、Java中的变量
在Java中变量划分方式有两种:
- 按数据类型划分:基本数据类型变量、引用数据类型变量
- 按声明位置划分:成员变量(定义在类中)、局部变量(定义在方法中)
2.2、Java中的数据类型
上面介绍了Java中的变量,而定义变量之前得先确定你定义的变量是什么数据类型,因此就需要知道Java中的数据类型有哪些。
Java中的基本数据类型有8种,分别是:byte(1字节)、short(2字节)、int(4字节)、long(8字节)、float(4字节)、double(8字节)、char(2字节)和boolean(4字节)
此外Java中还三种的引用类型,分别是:类、接口和数组。
2.3、Java中的运算符
第一步:了解Java中的运算符有哪些,Java中的运算符有以下几种:
- 算术运算符:+、-、*、/、++、–、%
- 赋值运算符:=、+=、-=、*=、/=、%=
- 关系运算符:==、<、>、!=、<=、>=
- 逻辑运算符:&、|、^(异或)、、&&、||
- 字符串连接运算符:+
- 三目运算符:a ?b :c (规则:a为布尔类型表达式,当a为真,执行b;a为假,执行c)
第二步:了解运算符的优先级,以下是Java中运算符的优先级图例

由图显示:运算符优先级的数字越小,代表着该运算符的优先级别越高,计算时越是优先进行计算。
2.4、Java中的标识符和关键字
标识符:Java 对包、类、方法、参数和变量等要素命名时使用的字符序列。
规则如下:
- 由字母、数字、下划线(_)和美元符号($)组成。
- 不能以数字开头。
- 区分大小。
- 长度无限制。
- 不能是 Java 中的保留关键字。
- 标识符命名习惯:见名知意。
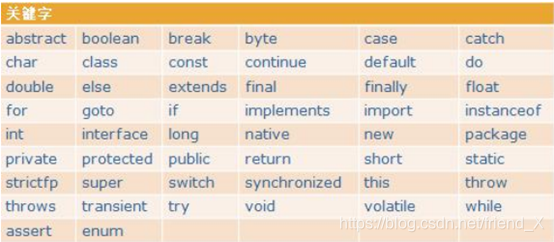
关键字:
2.5、Java中的方法
Java中方法用于封装一段特定的逻辑功能。方法的主要构成要素有:权限修饰符 方法名、参数列表、返回值和方法体。方法的编写格式如下:
权限修饰符 返回值类型 方法名称(参数列表){
方法中封装的逻辑功能; return 返回值; }
(1)方法的权限修饰符有以下几种,第一行的作用域的意思是:使用了该权限修饰符后的方法可以使用的区域:

(2)方法的返回值类型:就是上面介绍的8中基本数据类型、数组和类,此外还有一个特殊的返回值类型是:void。返回值类型使用了void的方法是没有返回值的。
(3)方法的参数列表:
- 在调用时传递给方法,需要被方法处理的数据。
- 在方法定义时,需要声明该方法所需要的参数变量。
- 在方法调用时,会将实际参数值传递给方法的参数变量。必须保证传递参数的类型和个数符合方法的声明。
3、Java中的流程控制
上面介绍完了Java的基础语法,现在来介绍编写的Java代码是如何执行的,也就是Java代码的流程控制。Java中的流程分为3大类:顺序结构、选择结构和循环结构,下面就分别来介绍这三种结构。
3.1、顺序结构
顺序结构很好理解,就是按照你编写代码的顺序,来执行程序。顺序结构执行代码的规则是:只有上一条代码执行完成后,才可以执行下一条代码,且不可以返回执行上一条代码。
3.2、选择结构
选择结构的意思就是:当满足某一条件时,可以选择性的执行某一条或某一段代码,该结构打破了顺序结构不能跳跃执行的约束。当然要实现选择结构,需要使用到Java中的特殊语句:if条件语句和switch条件语句。
(1)if条件语句分为以下几种
- if(条件){…}
- if(条件){…}else{…}
- if(条件){…}else if(条件){…}
- if(条件){…}else if(条件){…}else{…}
第一种的规则是:当条件满足时:执行if语句的大括号中的代码,不满足则不执行;
第二种的规则是:当条件满足时,执行if语句的大括号的代码,不满足则执行else语句的大括号的代码;
第三种的规则是:当第一个条件满足时,执行第一个if语句的大括号的代码,不满足则判断第二个条件,第二个条件满足时,执行第二个if语句的大括号的代码,如果都不满足,那都不执行;
第四种的规则是:当第一个条件满足时,执行第一个if语句的大括号的代码,不满足则判断第二个条件,第二个条件满足时,执行第二个if语句的大括号的代码,如果都不满足,则执行else语句的大括号的代码。
(2)switch条件语句
- switch(一个变量){ case 一个常量值: {…} break; case 一个常量值: {…} break; case 一个常量值: {…} break; … default : {…} break; }
switch条件语句的规则是:你需要在小括号中放入一个变量,而变量的值决定了你执行那一段代码。当某一个case后面的值与小括号中的变量的值相等时,则执行这个case和它后面break之间的代码,如果没有一个case后面的值与变量的值相等,则执行default和它后面break之间的代码。注意:case后面值的类型要与变量的值类型一致且不可以重复。
下面是Java代码示例:
public class Demo{ public static void main(String[] args) { int a = 3; switch(a){ case 1: System.out.println("a的值为1"); break; case 2: System.out.println("a的值为2"); break; case 3: System.out.println("a的值为3"); break; default : System.out.println("a的值为4"); break; } }} 最后输出的是:a的值为3 这一结果。
3.3、循环结构
循环结构的意思就是:当某个条件满足时,就会重复执行某条或某段代码,直到条件不满足时,才会停止执行,或者是遇到跳转语句时,也会根据跳转语句做出相应的改变。该结构打破了顺序结构不可以返回执行的约束。当然要实现虚循环结构需要使用到Java中的特殊语句:while循环语句、do-while循环语句和for循环语句
(1)while循环语句的结构:
- while(条件){ … }
该结构的规则是:先进行条件的判断,满足则执行大括号内的代码,不满足则不执行。当条件满足时,就会进入循环状态,就是执行完一遍大括号内的代码后,会再次进行条件判断,满足则执行,不满足则不执行的情况。注意:当你的条件是永远满足时,那么该循环就会进入死循环,不会停止。所以要注意条件的设置是否合理。
public class Demo{ public static void main(String[] args) { int a = 3; while(a>0){ System.out.println(a); a--; } }} (2)do-while循环语句的结构:
- do{ … }while(条件)
该结构的规则是:先执行大括号内的代码,执行完之后进行条件的判断,当条件满足时,就会进入循环状态,就是再执行一遍大括号内的代码,而不满足则不执行。注意:当你的条件是永远满足时,那么该循环就会进入死循环,不会停止。所以要注意条件的设置是否合理。
public class Demo{ public static void main(String[] args) { int a = 3; do{ System.out.println(a); a--; }while(a>0) }} (3)for循环语句的结构:
- for(一个int类型的变量;变量满足某个条件;变量发生变化){ … }
该结构的规则是:先进行条件的判断,满足则执行大括号的代码,不满足则不执行。当条件满足时,执行完大括号内的代码后,进行的是变量的变化,变量变化以后,在执行条件的判断,满足则进入循环状态,不满足则不执行。
public class Demo{ public static void main(String[] args) { for(int i=0;i<3;i++){ System.out.println(i); } }} 3.4、break、continue和return
在上面循环结构中提到了跳转语句可以改变循结构的执行,接下来就来介绍这些跳转语句吧。
跳转语句分为三种:break、continue和return
(1)break的跳转规则是:当循环时遇到了break,则会直接跳出循环,执行下一阶段的代码
(2)continue的跳转规则是:当循环时遇到了continue,则这一次的循环被跳过,不影响接下来的循环。
(3)return的跳转规则是:当执行的循环是在某个方法中,而且执行时遇到了return,那么将会直接跳出整个方法,执行下一阶段的代码。
4、Java中数组的介绍
数组是Java中的引用类型的一种,下面就来介绍数组的相关内容吧。
4.1、数组的特点
数组的特点就是:它是相同数据类型的多个数据的容器,在数组中数据的存放是一个接一个的,也就是:线性排列。每个存储的数据都对应着一个标识,这个标识就是数组的下标,而且数组的下标是从数字0开始依次递增,最大下标数 = 数组中存放元素的数量 -1。
4.2、数组如何创建
数组的创建有以下几种:
- 数据类型[ ] 数组名称 = new 数据类型[数组长度];
- 数据类型[ ] 数组名称 = {数组内容 1,数组内容 2,数组内容 3…数组内容 n};
- 数据类型[ ] 数组名;
- 数据类型[ ] 数组名称 = new 数据类型[ ]{内容 1,内容 2,内容 3…内容 n};
public class Demo{ public static void main(String[] args) { int[] a = new int[10]; int[] b = { 1,2,3,4}; int[] c; int[] d = new int[]{ 1,2,3,4}; }} 第一种和第二种是比较常使用的创建方法,一种的先定义数组的长度(也就是可以存放元素的个数)之后再进行赋值;第二种是直接在创建时就为数组赋值,数组的长度就等于你赋值的个数,
第三种是不常用的方式,个人推荐不要使用该方式创建数组,因为很容易产生空指针异常,因为该方法只是只创建了数组引用名, 并未在内存创建数组空间。
第四种方式也不是很常用,但相较于第三种而言是安全的。
注意事项:(1)数组未赋值: 空指针异常;(2)超出长度的下标操作: 数组越界异常;(3)数组的长度在创建时就固定了。
4.3、数组的使用
4.3.1、数组的赋值
上面介绍了数组的创建方式,接下来介绍如何给空数组赋值,赋值的方式很简单,如下演示:
public class Demo{ public static void main(String[] args) { int[] a = new int[10]; a[0] = 0; a[1] = 1; a[2] = 2; }} 这样就给数组中下标为0、1、2的位置存放了元素0、1、2。注意赋值时,下标数不可大于数组的长度-1
4.3.2、数组中值的获取
知道了数组如何赋值,接下来介绍数组如何取值。取值的方式也很简单,如下演示:
public class Demo{ public static void main(String[] args) { int[] a = new int[10]; a[0] = 0; a[1] = 1; a[2] = 2; System.out.println(a[0]); System.out.println(a[1]); System.out.println(a[2]); }} 这样就会在控制台输出数组中下标为0、1、2的值了。注意取值时,下标数不可大于数组的长度-1
4.3.3、数组的遍历
将数组中的所有数据进行输出就是对数组进行遍历操作,数组的遍历需要用到for循环语句的介入,而且还需要知道这个数组的长度是多少,而数组的长度的获取就要用到数组的一个属性了:length。下面就来演示数组的遍历操作吧
public class Demo{ public static void main(String[] args) { int[] a = { 1,2,3,4,5,6,7}; for(int i=0;i 这样便可以将数组中的每一个数据都显示到控制台中。
4.4、数组的常用算法
数组中有两个常用的算法:冒泡排序和二分查找,这俩方法中第一个方法是给数组中的数据进行大小的升序排序;第二个方法是确定数组中是否含有某个指定的值,并获得该值在数组中的下标位置。
4.4.1、冒泡排序
冒牌排序的原理:首先比较相邻的元素,如第一个元素比第二个元素大,则将两者进行交换,接下对每一个相邻的元素都进行比较,从第一个比较到最后一个,这一轮会将最大的数据放在最后,之后在进行上述的操作,不过这次不用比较最后一个了,最后一直执行比较操作,直到将数据排列整齐。
以下是Java代码实现:
public class Demo{ public static void main(String[] args) { int[] a = { 8,5,6,12,10}; for(int i=0;i a[j+1]) { int b = a[j+1]; a[j+1] = a[j]; a[j] = b; } } } for(int c:a) { System.out.print(c+" "); } }} 以下是效果图:

4.4.2、二分查找
二分查找的原理:首先,将数组中间位置的数据与查找数据比较,如果两者相等,则查找成功;否则利用中间位置记录将数组分成前、后两个子数组,如果中间位置数据大于查找数据,则进一步查找前子数组,否则进一步查找后子数组。重复以上过程,直到找到满足条件的数据,则表示查找成功,直到子数组不存在为止,表示查找不成功。
注意:二分查找需要满足的条件是:数组中的数据是升序排列的,因此在使用二分查找时,可以使用冒泡排序进行数组的排序操作。
以下是Java代码实现:
public class Demo{ public static void main(String[] args) { int[] a = { 8,5,6,12,10,15,3,20}; for(int i=0;i a[j+1]) { int b = a[j+1]; a[j+1] = a[j]; a[j] = b; } } } System.err.print("数组中的数据为:["); for(int e:a) { System.err.print(e+" "); } System.err.print("]"); System.out.println(); int minIndex = 0; int maxIndex = a.length-1; int centerIndex = (minIndex+maxIndex)/2; boolean c = true; int d = 12; while(c) { if(a[centerIndex]==d) { c = false; System.err.println("元素12在数组中存在且下标为:"+centerIndex); }else if(a[centerIndex] d) { maxIndex = centerIndex-1; }else if(minIndex>maxIndex){ System.err.println("元素12在数组中不存在"); c = false; } centerIndex = (minIndex+maxIndex)/2; } }} 以下是效果图:

以上就是对Java基础的相关介绍了,希望文章可以帮到你们,谢谢阅读。如果想了解更多关于Java方面的知识可以关注我,我将会不定期更新博文。
转载地址:http://olsm.baihongyu.com/